

Welcome to our blog post titled Guide How to Patch a Tire: Step-By-Step Instructions for Efficient Repair.
As responsible vehicle owners, it is crucial for us to possess the knowledge and skills required to address common tire-related issues.
One of the most essential skills to acquire is the ability to patch a tire effectively, ensuring its longevity and optimal performance.
By mastering this skill, you can save both time and money, while also guaranteeing your safety on the road.
So, let’s get started and explore the step-by-step process of patching a tire for a seamless repair experience.
Table of Contents
Understanding the Patching Process
So you’ve got a flat tire, huh? Don’t worry, it happens to the best of us! Instead of immediately shelling out your hard-earned cash for a new tire, why not try patching it yourself?
Patching a tire may seem daunting at first, but with the right tools and a little know-how, you’ll be back on the road in no time.
In this guide, we’ll take you through each step of the patching process, ensuring that you can efficiently repair your tire without breaking the bank.
Gathering the Necessary Materials
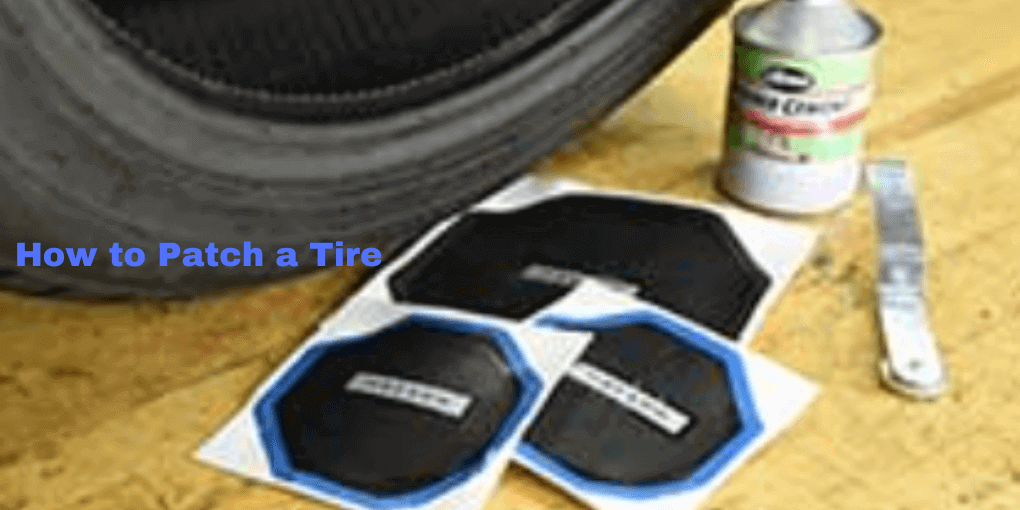
Before you embark on your tire patching adventure, ensure you have all the necessary materials. You’ll need a tire repair kit, which typically includes a patch, reaming, and plug tool.
Also, ensure you have a jack, lug wrench, and a pair of pliers on hand. Safety goggles and gloves are also recommended, as tire repair can be a messy job.
Once you have all your tools ready, you’re one step closer to getting that flat tire back in shape!
Locating the Puncture
The next step is to locate the puncture in your tire. Begin by deflating the tire completely and removing it from your vehicle.
Before you proceed, it’s important to ensure your safety by putting on your gloves and goggles. Inspect the tire closely, looking for any nails, screws, or debris that may have caused the puncture.
If you can’t find anything visually, you can also listen for the hissing sound of escaping air or spray a soapy water solution over the tire. Bubbles will indicate the location of the leak.
Preparing the Tire
Once you’ve located the puncture, it’s time to prepare the tire for patching. Take your reaming tool and insert it into the hole, twisting it back and forth to enlarge the puncture slightly.
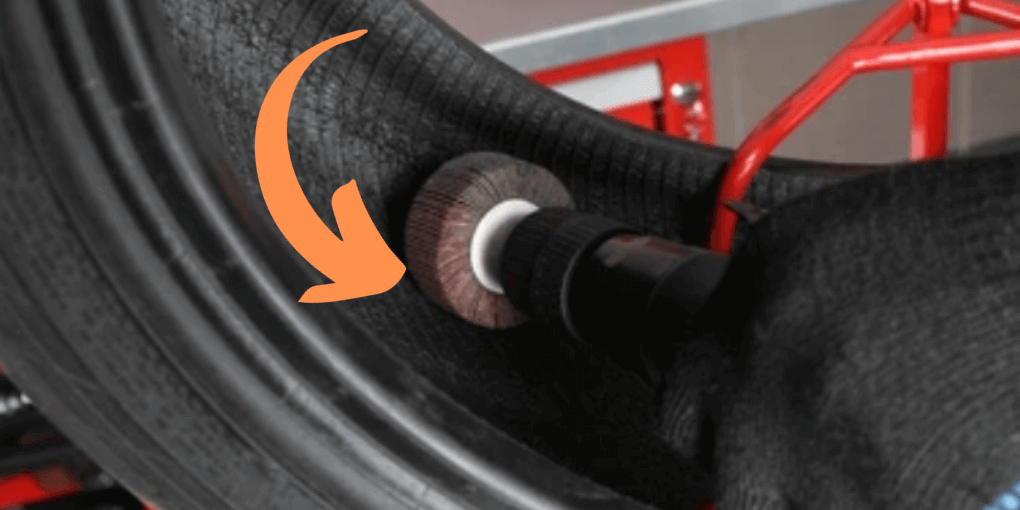
This step helps create a clean and smooth surface for the patch to adhere to. After reaming, take a piece of sandpaper or a wire brush to roughen the area around the puncture.
This rough surface will improve the patch’s grip. Wipe away any dust or debris with a clean cloth and you’re ready to move on to the next step!
Applying the Patch
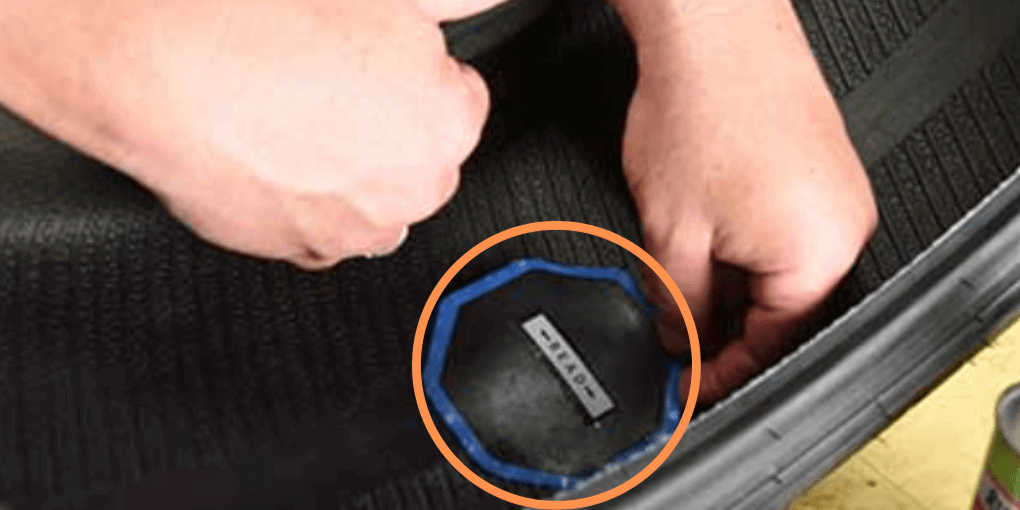
After applying the patch, it’s crucial to ensure a secure bond between the patch and the tire. This can be achieved by using a roller or press tool to firmly apply pressure on the patch.
This step enhances the adhesion and minimizes the risk of the patch coming off when the tire is in use.
Additionally, it is advisable to monitor the repaired tire for any signs of air leaks or unexplained drops in tire pressure, as this might indicate an ineffective patch that requires reevaluation.
Patching a tire is a valuable skill to have, especially in situations where a new tire is not immediately accessible or economically feasible.
Understanding the patching process allows you to take charge of the situation and safely repair your tire.
Remember to thoroughly inspect the tire, clean the punctured area, choose the appropriate patch type, apply it correctly, and ensure a secure bond.
By following these comprehensive guidelines, you can confidently extend the life of your tire and maintain a safe driving experience on the road.
Gathering the Necessary Tools and Materials
Hey there, fellow car enthusiasts! We know flat tires can be a total buzzkill, but fear not – we’re here to guide you through the process of patching a tire like a pro.
First things first, you’re gonna need some tools and materials to get started. Here’s what you’ll need:

Tire patch kit: This is your ultimate savior in times of tire trouble. Make sure to get a high-quality patch kit that includes a rubber patch, adhesive, and a scraper.
You can find these at any local auto supply store or even order one online.
Tire pressure gauge: It’s always a good idea to double-check your tire pressure before getting down to business.
Having a gauge handy will ensure you have the appropriate air pressure for your tires.
Jack and Lug Wrench: These tools are essential to lift your vehicle and remove the flat tire.
Make sure you have a jack that can handle the weight of your car and a lug wrench that fits your car’s lug nuts.
Rubber cement: This is the magical adhesive that helps to secure your patch in place.
Make sure you have a good quality rubber cement that can withstand the heat and stress your tires go through.
Pliers and a rasp tool: These tools come in handy when it’s time to prepare the damaged area of your tire for patching.
With the pliers, you can remove any foreign objects stuck in the tire, while the rasp tool roughens up the area to create a better bond for your patch.
Now that you’ve got your arsenal of tools and materials ready, let’s move on to the next step: finding the puncture.
Stay tuned for our next blog post to learn how to locate and patch that pesky tire!
Step-by-Step Instructions: How to Patch a Tire
Has the unseen menace of a flat tire ever left you stranded on the side of the road? Fret not! Patching a tire is not as daunting as it may seem.
With a bit of guidance and the right tools, you can fix it up yourself in no time.
In this comprehensive repair guide, we will walk you through the step-by-step process of patching a tire, empowering you with the knowledge to get back on the road quickly and confidently.
Step 1: Assess the Damage Before you embark on the repair mission, identify the location and severity of the puncture. Examine the tire surface for any visible foreign objects or sharp debris.
If the hole is larger than a quarter-inch in diameter, or if the damage extends to the sidewall or shoulder, unfortunately, patching might not be feasible, and you may need to replace the tire.
Step 2: Gather the Required Tools To execute a successful tire patch, you will need a few essentials. Grab a tire patch kit, which typically includes a rasp or file, rubber cement, tire plugs, and a probing tool.
Make sure you also have a jack, lug wrench, and a spare tire handy, as you may need to remove the damaged tire for repair.
Step 3: Prepare the Tire Begin by deflating the tire completely and removing it from the vehicle using the jack and lug wrench.
Once the tire is safely detached, use the rasp or file from the patch kit to clean the damaged area.
Roughen the surface around the puncture to ensure proper adhesion between the patch and the tire.
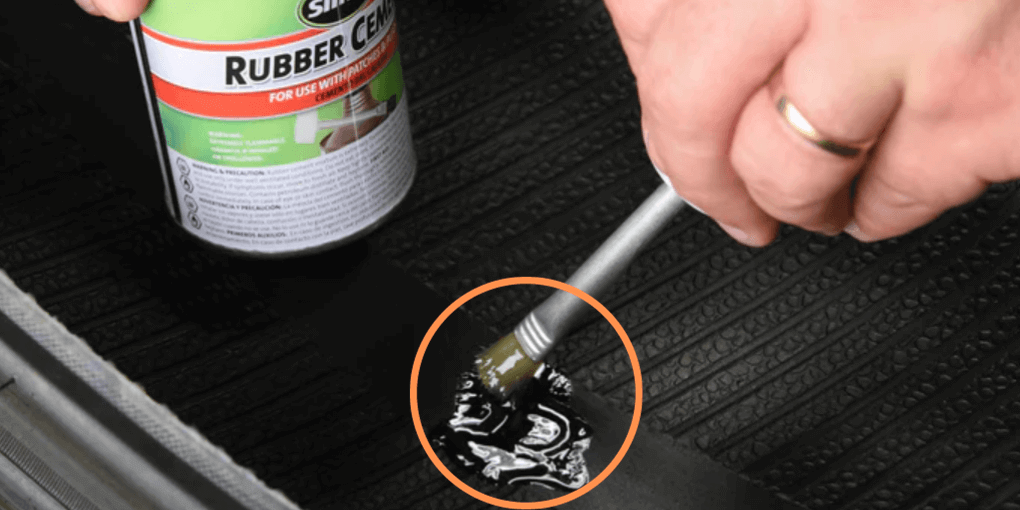
Step 4: Apply the Patch Apply a generous amount of rubber cement to the rasp, and swab it around the cleaned area.
Allow the cement to dry for a minute or two. Next, take a tire plug from the repair kit and insert it into the eye of the probing tool.
Carefully insert the tool into the puncture, ensuring the plug is securely in place.
Slowly withdraw the tool, leaving the plug behind to seal the hole.
Step 5: Inflate and Test Once the patch is securely applied, re-inflate the tire to the recommended pressure.
Use a tire pressure gauge to ensure it matches the manufacturer’s specifications.
Give the patched area a thorough visual inspection, and if it appears sealed without any leaks, you can feel confident in the success of your tire repair.
Patching a tire is a handy skill to possess, as it can save you time, money, and the inconvenience of being stranded.
By following these step-by-step instructions, you can regain your mobility swiftly.
However, remember that tire patching is a temporary fix, and it’s always advisable to consult a professional tire technician for a proper inspection and long-lasting repair.
So, equip yourself with the right tools and knowledge, and the next time a flat tire strikes, you’ll be prepared to patch it up with ease!
Additional Tips and Considerations
So you’re driving down the road, enjoying a smooth ride, when suddenly you hear the dreaded hissing sound. You’ve got a flat tire.
Don’t panic, though, because, with a little know-how and a few simple tools, you can easily patch that tire and get back on the road in no time.
In this comprehensive guide, we’ll take you through the steps of patching a tire, so let’s dive in!
Assess the Damage: The first step in patching a tire is to assess the damage. Is it a small puncture or a big gash?
If you have a puncture smaller than 1/4 inch, you’re in luck – it can be patched.
However, if the damage is larger or located on the sidewall, it’s better to replace the tire altogether. Safety first!
Remove the Tire: Before you can patch the tire, you’ll need to remove it from the wheel. Loosen the lug nuts with a wrench and lift the car using a jack.
Make sure to secure the car properly before crawling underneath.
Once you’ve removed the tire, locate the puncture spot by inflating it and listening for the hissing sound or applying soapy water and looking for bubbles.
Patching the Tire: To patch the tire, you’ll need a tire plug kit that includes a reamer, plug insertion tool, and tire plugs.
Start by reaming the puncture hole to clean and widen it. Then, take a plug and insert it into the tool, coating it with rubber cement.
Push the plug into the hole until only a small portion is sticking out. Finally, trim the excess plug, leaving about 1/8 inch protruding from the tire.
Reinstall the Tire: With the patch in place, it’s time to reinstall the tire. Mount it back onto the wheel and tighten the lug nuts in a star pattern to ensure an even distribution of force.
Once all the nuts are tight, lower the car and remove the jack. Give the tire a quick spin to make sure it’s securely mounted.
Additional Tips and Considerations: It’s essential to check the tire pressure after patching to ensure it is within the recommended range.
Underinflated or overinflated tires can affect your vehicle’s performance and safety.
If you’re not confident in your ability to patch the tire, it’s always best to seek professional help.
Tire shops have the expertise and equipment to handle tire repairs effectively.
Keep a tire repair kit and a portable air compressor in your car for emergencies.
These tools can save you from getting stranded on the side of the road and help you patch your tire until you can reach a professional.
Remember, patching a tire should only be considered a temporary fix. It’s always recommended to replace a damaged tire as soon as possible.
However, knowing how to patch a tire can be a valuable skill, and it’s reassuring to know that you can handle a minor tire emergency on your own.
So get your tools ready, take a deep breath, and with a little effort, you’ll be back on the road in no time!
FAQs About The “How to Patch a Tire”
Certainly! Here are the step-by-step instructions for patching a tire, ensuring a thorough and effective repair process:
- Assess the Damage: Begin by examining the tire for any punctures or damage. If the puncture is larger than 1/4 inch or located on the sidewall, the tire may need professional repair or replacement.
- Prepare the Workspace: Find a clean and well-lit area to work on. Ensure that you have all the necessary tools and materials ready, including a tire patch kit, a tire jack, and a lug wrench.
- Lift the Vehicle: Use the lug wrench to loosen the lug nuts on the tire. Then, lift the vehicle with a tire jack, providing enough space to remove the damaged tire.
- Remove the Tire: Completely remove the lug nuts and gently take off the damaged tire. Lay the tire on a flat and sturdy surface, making sure the punctured area is accessible.
- Locate the Puncture: Inflate the tire slightly to identify the puncture site. You can apply a soapy water solution to the tire’s surface and watch for bubbles, indicating the location of the leak.
- Prepare the Area: Use a coarse-grit sandpaper or a rasp tool to roughen the area around the puncture. This will help the patch adhere securely to the tire.
- Apply the Vulcanizing Cement: Apply a thin layer of vulcanizing cement to the roughened surface, extending beyond the puncture site. Allow the cement to dry for a few minutes, following the manufacturer’s instructions.
- Insert the Patch: Take a patch from the tire patch kit and place it over the puncture, ensuring it overlaps the damaged area. Press the patch firmly onto the tire, using a roller or a smooth object to create a strong bond.
- Reinstall the Tire: Carefully lift the tire and align it with the wheel bolts. Tighten the lug nuts by hand before using a lug wrench to firmly secure them. Lower the vehicle back to the ground.
- Test for Leaks: Inflate the patched tire to the recommended pressure and spray a mixture of soapy water onto the patch. If no bubbles form, it indicates a successful repair.
Remember, if you are unsure about tackling tire patching yourself, it’s advisable to seek professional help. Properly patched tires can ensure safer and more reliable driving.
Absolutely! Here are the specific safety precautions you should take before attempting to patch tire to ensure a safe and successful repair:
Personal Safety Gear: Prioritize your safety by wearing appropriate personal protective equipment (PPE) such as gloves and safety glasses. These will protect your hands and eyes from potential injuries, like cuts or exposure to chemicals.
Parking in a Safe Location: Ensure your vehicle is parked on a flat surface away from traffic. Engage the parking brake to prevent any unintended movement during the repair process.
Use Wheel Chocks: Place wheel chocks on both sides of the tire that you won’t be working on. This prevents the vehicle from rolling and adds an extra layer of safety.
Deflate the Tire: Before attempting to patch a tire, release all the air by removing the valve cap and pressing the valve core with a tool. This will prevent any unexpected release of pressure or sudden movement during the repair.
Avoid Inflammable Substances: Keep flammable liquids, such as gasoline or solvents, away from your work area to minimize any risk of ignition.
Understand the Tire’s Condition: Inspect the tire thoroughly to ensure there are no signs of significant damage, like sidewall bulges or cuts that may require professional intervention. Attempting to patch such severe damages could compromise your safety.
Adequate Ventilation: If you’re working in an enclosed area, make sure there is proper ventilation to prevent the accumulation of any harmful fumes from tire repair chemicals.
Follow Manufacturer Instructions: Read and understand the instructions provided with the tire patch kit before starting the repair process. Different patch kits may have specific guidelines and variations, so make sure to adhere to the instructions provided.
Replace Damaged Valve Stems: If you notice any damage or cracks in the valve stem while working on the tire, replace it to ensure a proper seal and prevent any air leaks.
Properly Inflate the Repaired Tire: After patching the tire, carefully inflate it to the recommended pressure using a pressure gauge and an air compressor. Overinflating the patched tire can lead to a blowout, while under inflation can negatively impact handling and safety.
By implementing these safety precautions, you can minimize risks and promote a safe working environment when patching a tire. Prioritizing your safety will result in a successful and reliable tire repair.
To effectively how patch a tire, you will need a set of tools and materials specifically designed for the repair process. Here is a comprehensive list of what you will require:
Tire Patch Kit: A tire patch kit is essential for tire repairs. It typically includes several components, such as rubber patches, vulcanizing cement or adhesive, and a scraper or rasp tool. The rubber patches are designed to seal the puncture, while the vulcanizing cement creates a strong bond between the patch and the tire.
Lug Wrench: A lug wrench is necessary to loosen the lug nuts securing the wheel to the vehicle. Different vehicles may require different sizes of lug wrenches, so ensure you have the appropriate size for your vehicle.
Tire Jack: A tire jack is essential for lifting the vehicle off the ground, providing enough clearance to remove the damaged tire. There are various types of jacks available, including scissor jacks and hydraulic jacks. Choose one suitable for your vehicle’s weight and design.
Valve Core Tool: A valve core tool is used to remove the valve core from the tire valve stem. This step is crucial to fully deflate the tire before repair.
Tire Pressure Gauge: A reliable tire pressure gauge is necessary to accurately measure the inflation pressure of the tire before and after the repair. This helps ensure proper tire inflation, which is vital for safe driving.
Air Compressor: An air compressor is required to inflate the tire to the recommended pressure after patching and before reinstalling it on the vehicle. It is advisable to have a portable air compressor for convenience.
Soapy Water Solution: The soapy water solution is used to detect leaks. By spraying this solution on the patched area, you can observe if any bubbles form, indicating an air leak and the need for further repair.
Clean Cloth or Towel: A clean cloth or towel is handy for wiping and cleaning the tire surface before applying the patch. It helps ensure proper adhesion of the patch to the tire.
Safety Equipment: Prioritize your safety by using personal protective equipment (PPE) such as gloves and safety glasses. These protect your hands and eyes during the repair process.
By having these tools and materials readily available, you can effectively patch your tire, restoring its functionality and ensuring safe driving conditions.
Certainly! Here are some tips for identifying the location of a puncture in a tire:
Visual Inspection: Conduct a visual inspection of the tire’s tread and sidewalls. Look for any obvious signs of punctures, such as nails, screws, or other sharp objects lodged in the tire. Inspect the entire circumference of the tire to ensure you don’t miss any potential punctures.
Listen for Air Leaks: In a quiet environment, listen carefully for the sound of escaping air. A hissing or whistling sound indicates a puncture nearby. Move slowly around the tire, focusing on areas where you suspect the puncture might be located.
Feel for Air Flow: Gently run your hand close to the tire’s surface, being cautious of any rotating components. Feel for any air movement, which can indicate the presence of a puncture. Pay particular attention to areas that appear damaged or where debris may have caused a puncture.
Soap and Water Solution: Prepare a mixture of soapy water by adding a few drops of liquid soap to water in a spray bottle. Spray the soapy water solution onto the tire’s surface, focusing on the areas you suspect may be punctured. If there is a puncture, you will observe the formation of bubbles indicating the exact location of the leak.
Submerging in Water: If the tire is small enough to fit into a container or basin, you can submerge it in water to identify the puncture. Inflate the tire slightly and slowly move it around in the water. Look for bubbles rising to the surface, pinpointing the location of the puncture.
Tire Pressure Loss: If you notice a gradual decrease in tire pressure over a short period, it could be an indicator of a slow puncture. Monitor the tire’s pressure regularly to identify any significant changes, which can help narrow down the search for the puncture.
Professional Tire Inspection: If you are unable to locate the puncture using the above methods or are uncertain about the tire’s condition, it is advisable to seek assistance from a professional tire service. They have specialized tools and expertise to accurately locate and repair tire punctures.
Remember, once you identify the location of the puncture, mark it with a chalk or marker to ensure you can locate it easily when it’s time for repair. It is important to address tire punctures promptly to prevent further damage and maintain tire safety and performance.
Yes, it is necessary to remove the tire from the vehicle in order to patch it effectively. Here’s why:
Accessibility: Removing the tire from the vehicle provides better accessibility to the punctured area. It allows you to thoroughly inspect the tire and locate the puncture more accurately. Working on a removed tire also provides a stable and controlled environment for the repair process.
Proper Inspection: By taking the tire off the vehicle, you can visually inspect the entire circumference of the tire, including the sidewalls, which may have punctures or damage that are not immediately visible when the tire is still mounted. This comprehensive inspection ensures that all punctures are identified and addressed.
Preparation of the Surface: Properly patching a tire requires preparing the surface around the puncture. This involves roughening the area with a rasp tool or sandpaper, applying vulcanizing cement, and firmly adhering the patch. These steps are easiest to perform when the tire is removed, allowing you to work on a flat and stable surface.
Safety: Removing the tire from the vehicle ensures the safety of the repair process. It eliminates any potential hazards that may arise when working on a mounted tire, such as accidental movements or damage to the vehicle. It also allows you to have better control and visibility during the repair, reducing the risk of injuries.
Accuracy and Effectiveness: Patching a tire while it is still mounted on the vehicle can be challenging and result in a less effective repair. The patch may not adhere properly, compromising the seal and increasing the risk of further damage or air leakage. By removing the tire, you can ensure a more accurate and reliable patch, increasing the chances of a successful repair.
While removing the tire from the vehicle may require additional effort, it is a necessary step to effectively patch the tire and ensure optimal safety and longevity.
Always follow proper safety precautions and consult your vehicle’s manual for specific instructions on tire removal and repair. If you are uncertain or uncomfortable with the process, seeking assistance from a professional tire service is recommended.
Patching a tire can be an effective and reliable solution for certain types of punctures, but it is important to understand that it may not always be a permanent fix. Here’s a detailed explanation:
Patching Suitability: A patch is typically suitable for punctures in the tire tread area caused by small objects such as nails, screws, or other road debris. As long as the puncture is within certain size limits (typically up to 1/4 inch), and not near the sidewall or shoulder where the structural integrity of the tire is compromised, a patch can effectively seal the puncture.
Quality of Repair: The longevity of a tire patch depends on several factors, including the quality of repair, the type of patch used, the condition of the tire, and how well the patch adheres to the tire surface. A properly applied patch using high-quality materials and performed by following recommended procedures can result in a reliable and lasting repair.
Regular Inspection: Even with a successful patch, it is essential to regularly inspect the tire for any signs of damage or air leakage. Monitor the patched area closely for any changes or issues. If you notice continued loss of air, bulges, sidewall damage, or any other abnormalities, it indicates that the tire may no longer be suitable for repair and should be replaced.
Age and Condition: The overall age and condition of the tire play a crucial role in determining whether a patch can be considered permanent. Over time, tires deteriorate due to factors like aging, exposure to UV rays, and wear and tear. If a tire is already nearing the end of its lifespan or has significant sidewall cracking or other forms of damage, it may not be wise to rely on a patch as a long-term solution. In such cases, replacing the tire is the safer option.
Professional Evaluation: It is always recommended to have a professional tire expert assess the condition of the tire and the suitability of a patch. They can provide an informed recommendation based on the specific circumstances and ensure your safety on the road.
In summary, while a well-performed tire patch can offer a permanent solution for certain types of punctures, the ultimate decision depends on factors like the size and location of the puncture, the quality of repair, and the condition of the tire itself. Regular inspections and professional guidance are crucial to determining the continued reliability of a patched tire.
While tire patching is a common method for repairing punctures, there are specific types of tires that cannot be patched due to safety concerns and structural limitations. Here are some types of tires that generally cannot be patched:
Run-Flat Tires: Run-flat tires are designed with reinforced sidewalls to allow the vehicle to continue driving even when completely deflated. These tires often have specific construction and unique features that prevent them from being patched. Manufacturers typically recommend replacing run-flat tires instead of attempting to patch them.
Sidewall Damages: Tires with punctures or damages in the sidewall area usually cannot be patched. The sidewall provides crucial structural support and helps maintain the tire’s shape and integrity. Any compromise to the sidewall can pose a significant safety risk. If a tire has sidewall damage, it is generally recommended to replace it.
Tire Age and Wear: Age and wear can affect the condition of a tire, making it unfit for patching. As tires age, they may develop dry rot, cracking, or become brittle, reducing their overall strength and reliability. Additionally, tires that have worn beyond certain tread depth limits may not be suitable for repairing and should be replaced.
Large or Irregular Punctures: Patches are typically effective for small punctures up to a certain size limit. If the puncture is too large, irregularly shaped, or caused by severe damage, it may be difficult to create a proper seal with a patch. In such cases, replacing the tire is often the recommended course of action.
Prior Improper Repairs: If a tire has undergone a previous improper repair attempt, such as an incorrect patch or the use of an incompatible adhesive, it may not be suitable for a subsequent repair. Improper repairs can compromise the tire’s integrity and safety, making it unsuitable for further patching.
It is crucial to consult a tire professional to assess the specific situation and determine whether your tire can be safely repaired. They can provide expert guidance based on the tire’s type, condition, and the nature of the damage. Prioritizing safety is essential when making decisions about tire repairs or replacements.
The time it takes to patch a tire can vary based on several factors, such as the skill level of the person performing the repair, the complexity of the puncture, and the tools used. In general, patching a tire can take anywhere from 20 minutes to an hour.
However, it’s important to prioritize quality over speed to ensure a reliable and long-lasting repair. Here’s a breakdown of the typical steps involved in patching a tire and their associated time:
Inspection and Assessment: This step involves visually inspecting the tire for the location and extent of the puncture, as well as assessing the overall condition of the tire. It usually takes a few minutes to carefully identify the puncture and determine the best course of action.
Preparation: Preparing the tire surface by roughening the area around the puncture, applying vulcanizing cement, and allowing it to dry can take an additional 5 to 10 minutes. This step is crucial for achieving a strong bond between the patch and the tire.
Applying the Patch: The actual patch application generally takes around 10-15 minutes. This includes selecting the appropriate patch size and shape, aligning it with the puncture, and firmly pressing it onto the prepared tire surface. Taking time to ensure proper adhesion and alignment is vital for a successful repair.
Post-patch Inspection: After applying the patch, it’s important to conduct a thorough post-patch inspection to ensure the repair is secure. This involves checking for any excess adhesive, verifying the patch’s alignment and coverage, and cleaning the tire surface. This step typically takes around 5 minutes.
Reinstallation and Inflation: Once the patch has been applied and the tire has been inspected, it can be reinstalled on the vehicle. This involves lifting the tire, aligning it with the wheel bolts, and tightening the lug nuts. Finally, inflating the tire to the recommended pressure using an air compressor can take an additional 5 to 10 minutes.
Final Checks: After the tire has been reinstalled and inflated, perform a final check to ensure proper installation and to verify that the patched tire is holding air pressure. This includes visually inspecting the tire for any visible signs of leaks, as well as using a pressure gauge to confirm that the pressure is within the recommended range. This step typically takes a couple of minutes.
It’s important to note that the times provided are general estimates and can vary depending on individual circumstances. Factors such as the availability of tools, experience with tire repairs, and the complexity of the puncture can influence the overall time for the patching process.
While it may be tempting to rush through the process, it is crucial to maintain a meticulous approach to ensure the patch is applied correctly. Properly following each step and allowing adequate drying or curing time, as specified by the manufacturer, can contribute to a successful and long-lasting repair.
If you are unfamiliar or uncomfortable with tire repairs, it is advisable to seek the assistance of a professional tire service. They have the expertise and equipment to efficiently and effectively patch the tire while ensuring your safety on the road.
Remember, prioritizing quality over speed when patching a tire will result in a reliable repair and help maintain optimal tire performance.
[
Yes, there is a recommended method for inspecting a patched tire to ensure it is safe for use. Here are the steps to properly inspect a patched tire:
Visual Inspection: Start by conducting a visual inspection of the patched area. Look for any signs of damage, bulges, or irregularities around the patch. Ensure that the patch is securely adhered to the tire’s surface without any peeling or lifting. Check for any visible cracks, cuts, or other signs of deterioration.
Pressure Check: Use a tire pressure gauge to check the inflation pressure of the patched tire. Compare the measured pressure against the recommended pressure indicated by the tire manufacturer or the vehicle’s manual. Ensure that the patched tire is properly inflated to maintain optimal performance, handling, and safety.
Leakage Test: To further check the integrity of the patch, perform a leakage test. Apply a soapy water solution or a commercial tire leak detector solution onto the patched area. Observe if any bubbles form, indicating air leakage. If there are bubbles or any signs of air escaping, it suggests that the patch may not be holding properly, and the tire should be reevaluated or replaced.
Sidewall Inspection: Pay close attention to the sidewalls of the patched tire. Inspect for any signs of damage, bulges, or sidewall cracking. Sidewall damage is a critical safety concern as it compromises the structural integrity of the tire. If there are noticeable sidewall issues, the tire should not be considered safe for use, even if the patch itself is intact.
Regular Monitoring: After the initial inspection, it is important to continue monitoring the patched tire periodically. Check the tire’s inflation pressure and visually inspect the patch area during routine tire maintenance and before long trips. Look for any changes or signs of degradation over time.
If, during the inspection, any abnormalities or concerns are identified with the patched tire, it is crucial to consult a tire professional. They can provide an expert opinion regarding the safety of the tire and suggest appropriate actions, which may include further repair or tire replacement to ensure your safety on the road.
When it comes to repairing a punctured tire, patching is often regarded as the most common and cost-effective solution. However, there are alternative options to consider depending on the extent and location of the tire damage:
Tire Plug: A tire plug, also known as a plug-patch or a rope plug, is an alternative to traditional patching. It involves inserting a rubber-coated cord into the puncture wound, which effectively seals the hole.
Tire plugs are typically quicker to apply compared to patches and can be a temporary solution for small punctures.
However, it’s important to note that tire plugs are generally considered a temporary fix. It is recommended to have the tire professionally inspected and repaired with a patch as soon as possible.
Tire Sealant: Tire sealants can be used as a temporary fix for small punctures. These sealants are typically injected into the tire through the valve stem, where they coat the inner surface of the tire, sealing the puncture.
While sealants can effectively repair minor punctures, they are not a permanent solution and may require a patch or replacement in the long run. It’s important to follow the manufacturer’s instructions for sealant usage and have the tire professionally inspected.
Replacement: In some cases, especially if the puncture is severe or in the sidewall area, patching may not be feasible or safe. In such instances, tire replacement becomes the best option.
It’s important to consider factors such as the age, wear, and overall condition of the tire when deciding whether to repair or replace it.
Additionally, if the tire has already been patched multiple times, it may be more prudent to replace it rather than attempt another repair.
Ultimately, the most suitable option depends on factors such as the size, location, and severity of the puncture, as well as the overall condition of the tire. It is crucial to consult with a professional tire service to assess the damage and determine the best course of action.
They can provide expert guidance tailored to your specific situation, taking into account safety, effectiveness, and cost considerations.
Conclusion:
So there you have it, folks! We hope you’ve enjoyed our comprehensive guide on how to patch a tire. With our step-by-step instructions and essential tips, you’ll be a pro at repairing punctured tires in no time.
Don’t let a flat tire put a damper on your day – with our guide, you’ll know exactly what to do when the rubber meets the road. So get out there and get patching! Happy driving!

Sudatta is a passionate automotive enthusiast and expert in the field. With a keen eye for detail and a love for all things automotive, he shares insightful articles and reviews to ignite the automotive passion in readers.