
Learn the art of tire changing with our quick & safe step-by-step guide. Master the essentials for a hassle-free experience. How to change a tire like a pro!
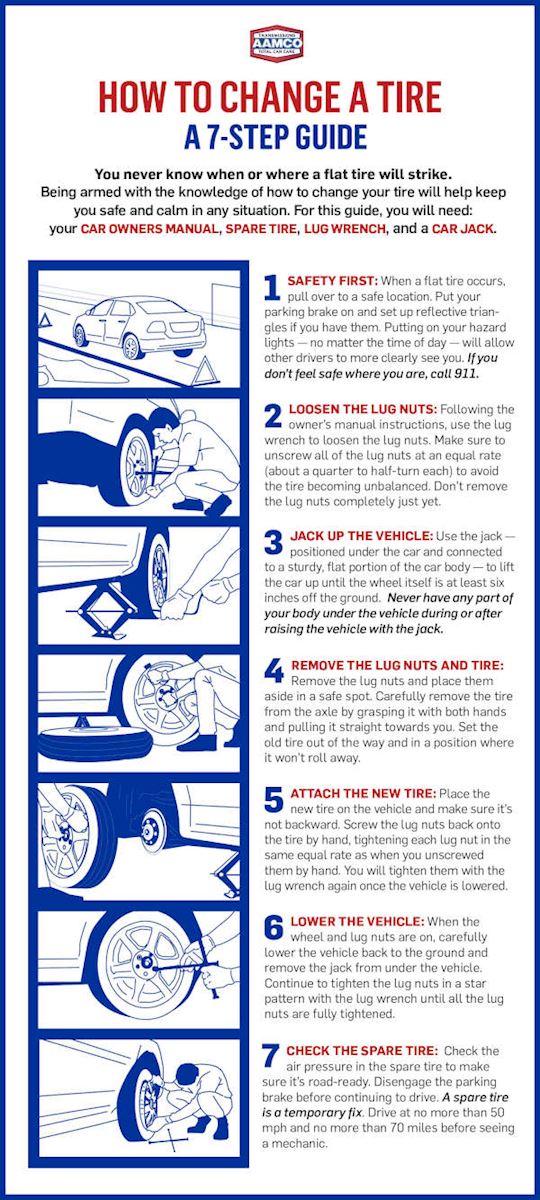
Experiencing a flat tire can be a daunting setback, especially when you’re on a tight schedule. Flat tires can strike at any time, leaving you stranded on the side of the road.
However, with the right tools and knowledge, changing a tire is a manageable task that should take approximately 30 minutes to complete.
The process involves a series of simple steps that, when performed safely and sequentially, will have you back on the road in no time.
Always remember to carry a spare tire, a jack, and a lug wrench in your vehicle, as they are essential tools for this operation.
Safety should be your top priority, so be sure to turn on your hazard lights and apply the parking brake before attempting to change a tire.

Credit: www.youtube.com
Essential Preparations Before You Start
Changing a tire need not be daunting. Prep steps are key. They ensure safety and make the process smooth. Take these steps seriously.
They turn a potential hassle into a swift fix. Let’s dive into how to secure your vehicle and what tools you’ll need.
Securing Your Vehicle
Safety first. Always. Before jacking up your car, make sure it’s parked on level ground. Use the parking brake. This helps prevent the car from rolling.
Place wheel chocks or heavy rocks behind the wheels for extra safety. Turn on your hazard lights. This alerts others that your vehicle is stopped.
Tools And Supplies You Will Need
The right tools make changing a tire easier. Here’s a handy list:
- Jack: To lift the car up.
- Lug Wrench: To loosen and tighten the nuts.
- Spare Tire: Make sure it’s inflated.
- Owner’s Manual: Guidance specific to your car.
- Wheel Wedges: For extra stability.
- Gloves: To keep your hands clean and safe.
- Flashlight: If it’s dark.
Keep these in your trunk. Always be ready. Flat tires happen when we least expect them.
Finding The Right Spot And Initial Steps
Embarking on a tire change requires not just skill but also the right environment for safety and efficiency. Beginning this task is as much about location as it is about the proper use of tools and technique.
Ensuring you start off correctly can save you time and keep you secure. Let’s guide you through picking the right spot and the crucial first steps you need to take.
Choosing A Safe Location
When a tire needs changing, your primary concern should be safety. A flat tire can happen anywhere, but where you choose to fix it is paramount. Aim for a flat, stable surface far from oncoming traffic.
Well-lit areas are preferred for visibility. Avoid curves or hills where drivers might not see you. Always look for a parking lot or a similar safe area whenever possible.
Applying The Parking Brake
Once you’ve found the right spot, the next step is to secure your vehicle from rolling. Engage the parking brake firmly to add stability and minimize the risk of the car moving.
Cars with automatic transmissions should be in ‘park’, and manual transmissions in ‘first gear’ or ‘reverse’. Ensure the parking brake indicator light on your dashboard is on as an added safety check.
- Switch off your vehicle.
- Turn on your hazard lights.
- Place wheel wedges, if available, under other tires as an extra precaution.
This careful preparation sets the foundation for a smooth and secure tire change. Remember, safety always comes first.
Removing The Wheel Cover And Loosening The Lug Nuts
Removing the Wheel Cover and Loosening the Lug Nuts is a critical step. It’s the gateway to replacing your tire. Execute this stage with care.
You’ll need a lug wrench and a bit of elbow grease. Keep safety in mind. Here’s how to tackle this like a pro.
Taking Off The Hubcap
Some vehicles come with hubcaps protecting the lug nuts. It’s vital to remove the hubcap before reaching the wheel.
- Find the notch or flat edge on your hubcap.
- Insert the flat end of your lug wrench or a screwdriver.
- Apply gentle pressure until the hubcap pops off.
Hubcaps can be snug. Take care not to jerk too hard or damage may occur. Set the hubcap aside. Ensure it’s away from the work area.
Loosening Nuts With The Wrench
Lug nuts must be loosened while the car is grounded. A turned off engine is also essential.
- Place the lug wrench on a lug nut.
- Hold the wrench with both hands.
- Turn counterclockwise.
- Use your body weight for more force.
- Loosen each lug nut about half a turn.
Do not remove lug nuts entirely yet. Only loosen them. This prevents the car from shifting. It also ensures easy removal once jacked up.
Credit: www.aamcoblog.com
Lifting The Vehicle With A Jack
Changing a tire requires safely lifting your vehicle off the ground. That’s where your trusty car jack comes in. Before getting started, ensure the car is on a flat surface and the parking brake is on.
Identifying The Jacking Points
Every car has specific jacking points. These are reinforced spots designed to support the car’s weight during a lift. Look in your owner’s manual for a detailed diagram.
It will show you where these points are located under your car. Usually, they are near the tires but always on the vehicle’s frame.
Raising The Car Safely
Safety is key when raising your car. Before lifting, place the jack under the proper jacking point. Make sure it’s positioned straight and firmly on the ground.
Lift the vehicle slowly and steadily. This prevents any sudden movements that could cause the jack to slip.
- Loosen the lug nuts slightly before lifting the car.
- Position the jack under the jacking point.
- Ensure the jack is on a flat, stable surface.
- Lift the car until the tire is off the ground.
- Only raise the car as much as necessary.
Once the car is lifted, place a jack stand under the vehicle for extra security before you start working on the tire. Do not rely solely on the jack to hold the car up while you change the tire.
Replacing The Tire
Got a flat tire? No worries! Replacing a tire can be simple. Follow these steps to get back on the road quickly.
Safety comes first, so make sure to do this in a safe location, away from traffic. You’ll need a jack, a wrench, and a spare tire.
Removing The Flat Tire
- Park your car on a flat surface, set the parking brake.
- Place wheel wedges against the tires opposite to the flat.
- Remove the hubcap or wheel cover if your vehicle has one.
- Use the wrench to loosen the lug nuts. Don’t take them off yet.
- With the jack, lift the vehicle off the ground.
- Remove the loosened lug nuts and keep them safe.
- Take the flat tire off the car by pulling it towards you.
Mounting The Spare Tire
- Lift and position the spare tire onto the wheel base.
- Hand-tighten the lug nuts onto the bolts in a star pattern.
- Lower the car slightly until the spare touches the ground but isn’t fully carrying the weight.
- Tighten the lug nuts with the wrench, follow the star pattern.
- Lower the car all the way, and remove the jack.
- Give the lug nuts a final tighten for security.
- Put the flat tire and tools back in your vehicle.
Finishing Up
Now that the spare tire is in position, let’s finish up properly. Doing these final steps right is crucial. They ensure your safety on the road.
Keep your vehicle running smoothly by tightening the lug nuts, lowering it back to the ground, and securing the damaged tire.
Tightening The Lug Nuts
It’s vital to tighten the lug nuts in the correct order. This ensures the tire sits evenly. Use a star pattern to tighten. For five lug nuts, start with one, then move to the opposite one. Keep tightening opposites.
Apply pressure evenly as you tighten. Do not fully tighten the first one before moving to the next.
Once all are snug, finish tightening them. Use a wrench and push with your body weight. Ensure they’re as tight as possible.
Lowering The Vehicle
Carefully lower your vehicle back to the ground. Slowly turn the jack handle in the opposite direction.
Watch as the car fully rests on the tire. Make sure it’s stable and secure before fully retracting the jack.
Storing The Damaged Tire
Always keep the damaged tire. You may repair it later. Put it in the trunk or tire well. Secure it well. Avoid it rolling around while you drive.
- Find the storage location in your vehicle.
- Place the damaged tire inside.
- Use a tie, bungee, or built-in mechanism to secure it.
Remember to get the damaged tire checked soon. Safety comes first. Keeping a well-maintained spare is part of responsible car care.
Post-change Checklist
You’ve just replaced your tire, but the job isn’t done yet. The ‘Post-Change Checklist’ ensures a safe and secure drive ahead.
These steps confirm the success of your tire change. Performing the checklist prevents future issues.
Checking Tire Pressure
Correct tire pressure is crucial for your car’s performance and safety. After changing a tire:
- Use a tire gauge to check pressure.
- Refer to your car’s manual for the optimal pressure.
- Inflate the tire if the pressure is below recommended levels.
- Recheck the pressure to confirm it’s within safe limits.
Visiting A Professional
Even skilled drivers need a professional’s eye. After a tire change, consider:
- Taking your car for a quick inspection.
- A professional can spot issues like misalignment.
- Professionals ensure the tire is balanced for smooth driving.
- They will double-check your work safely.

Credit: www.aamcoblog.com
Frequently Asked Questions For How To Change A Tire
How Do You Change A Tire Step By Step?
To change a tire, start by parking safely and applying the handbrake. Place a wheel wedge, then loosen the lug nuts. Use a jack to lift the car, remove the nuts and flat tire.
Mount the spare tire, tighten the nuts partially, lower the car, and then secure the nuts completely.
Can You Change A Tire By Yourself?
Yes, you can change a tire yourself by following the vehicle’s manual, using the correct tools, loosening the lug nuts, jacking up the car, and replacing the tire securely. Make sure to practice safety at all times.
What Is The Correct Order For Changing A Tire?
Follow these steps to change a tire: Park on a flat surface, apply the parking brake, loosen lug nuts, jack up the car, remove lug nuts, replace the tire, hand-tighten lug nuts, lower the car, and fully tighten lug nuts.
How Do You Change A Tire That Is Not A Spare?
To change a non-spare tire, loosen the lug nuts, jack up the car, remove the flat tire, and mount the replacement tire. Finally, tighten the lug nuts securely.
Conclusion
Changing a tire need not be a daunting task. With the right tools and these steps, you’ll be back on the road swiftly. Remember, regular practice and precaution are key.
Keep this guide handy for emergencies and drive confidently, knowing you’re prepared for those unexpected flat tires.
Safe travels!

Sudatta is a passionate automotive enthusiast and expert in the field. With a keen eye for detail and a love for all things automotive, he shares insightful articles and reviews to ignite the automotive passion in readers.